
How to Tie Knots
Contains ads
100+
Downloads

Everyone
info
About this app
How to Tie Knots: A Comprehensive Guide
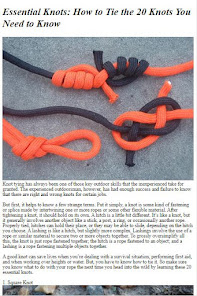
Tying knots is an essential skill that proves useful in various situations, from outdoor adventures to everyday tasks. Whether you're a sailor, camper, climber, or just someone who loves DIY projects, knowing how to tie different types of knots can be incredibly beneficial. This guide will walk you through the basics of knot tying, including essential knots, their uses, and step-by-step instructions.
1. Essential Knots and Their Uses
Square Knot (Reef Knot)
Use: Securing packages, joining two ropes of equal thickness.
How to Tie:
Hold one end of the rope in each hand.
Pass the right end over and under the left end.
Pass the left end over and under the right end.
Pull both ends to tighten the knot.
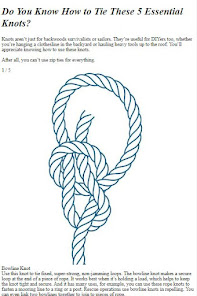
Bowline
Use: Creating a fixed loop at the end of a rope, rescue operations.
How to Tie:
Make a small loop in the rope, leaving enough rope on either side.
Pass the end of the rope through the loop from the underside.
Wrap the end around the standing part of the rope.
Pass the end back through the loop and tighten.
Clove Hitch
Use: Securing a rope to a post or tree, starting lashings.
How to Tie:
Wrap the rope around the post.
Cross the rope over itself and wrap it around the post again.
Tuck the end of the rope under the last wrap and pull tight.
Figure Eight Knot
Use: Preventing the end of a rope from slipping through a device or knot.
How to Tie:
Make a loop in the rope.
Pass the end of the rope over the standing part and through the loop.
Pull tight to form the figure eight shape.
Sheet Bend
Use: Joining two ropes of different thicknesses.
How to Tie:
Form a loop with the thicker rope.
Pass the end of the thinner rope through the loop from underneath.
Wrap the thinner rope around both parts of the loop.
Pass the end of the thinner rope back under itself and tighten.
2. Step-by-Step Instructions
Square Knot (Reef Knot)
Step 1: Cross the right end over the left end.
Step 2: Tuck the right end under the left end and pull tight.
Step 3: Cross the left end over the right end.
Step 4: Tuck the left end under the right end and pull tight.
Bowline
Step 1: Create a small loop, leaving a long end.
Step 2: Pass the end through the loop from the underside.
Step 3: Wrap the end around the standing part.
Step 4: Pass the end back through the loop and pull tight.
Clove Hitch
Step 1: Wrap the rope around the post.
Step 2: Cross the rope over itself and wrap it around the post again.
Step 3: Tuck the end under the last wrap and pull tight.
Figure Eight Knot
Step 1: Make a loop in the rope.
Step 2: Pass the end over the standing part and through the loop.
Step 3: Pull tight to form a figure eight shape.
Sheet Bend
Step 1: Form a loop with the thicker rope.
Step 2: Pass the end of the thinner rope through the loop from underneath.
Step 3: Wrap the thinner rope around both parts of the loop.
Step 4: Pass the end of the thinner rope back under itself and tighten.
3. Tips for Tying Knots
Practice Regularly: The more you practice, the more proficient you will become at tying knots.
Use the Right Rope: Different tasks require different types of ropes. Choose the right one for your specific need.
Keep Knots Tight: A loose knot can fail when put under pressure. Always ensure your knots are secure and tight.
Learn Knot Terminology: Familiarize yourself with terms like standing end, working end, and bight to follow instructions more easily.
Conclusion
Mastering the art of knot tying can greatly enhance your skills in various activities, from camping and sailing to DIY projects. With practice and the right techniques, you'll be able to tie knots confidently and securely. Start with these essential knots and expand your knowledge as you go. Happy knot tying!
Tying knots is an essential skill that proves useful in various situations, from outdoor adventures to everyday tasks. Whether you're a sailor, camper, climber, or just someone who loves DIY projects, knowing how to tie different types of knots can be incredibly beneficial. This guide will walk you through the basics of knot tying, including essential knots, their uses, and step-by-step instructions.
1. Essential Knots and Their Uses
Square Knot (Reef Knot)
Use: Securing packages, joining two ropes of equal thickness.
How to Tie:
Hold one end of the rope in each hand.
Pass the right end over and under the left end.
Pass the left end over and under the right end.
Pull both ends to tighten the knot.
Bowline
Use: Creating a fixed loop at the end of a rope, rescue operations.
How to Tie:
Make a small loop in the rope, leaving enough rope on either side.
Pass the end of the rope through the loop from the underside.
Wrap the end around the standing part of the rope.
Pass the end back through the loop and tighten.
Clove Hitch
Use: Securing a rope to a post or tree, starting lashings.
How to Tie:
Wrap the rope around the post.
Cross the rope over itself and wrap it around the post again.
Tuck the end of the rope under the last wrap and pull tight.
Figure Eight Knot
Use: Preventing the end of a rope from slipping through a device or knot.
How to Tie:
Make a loop in the rope.
Pass the end of the rope over the standing part and through the loop.
Pull tight to form the figure eight shape.
Sheet Bend
Use: Joining two ropes of different thicknesses.
How to Tie:
Form a loop with the thicker rope.
Pass the end of the thinner rope through the loop from underneath.
Wrap the thinner rope around both parts of the loop.
Pass the end of the thinner rope back under itself and tighten.
2. Step-by-Step Instructions
Square Knot (Reef Knot)
Step 1: Cross the right end over the left end.
Step 2: Tuck the right end under the left end and pull tight.
Step 3: Cross the left end over the right end.
Step 4: Tuck the left end under the right end and pull tight.
Bowline
Step 1: Create a small loop, leaving a long end.
Step 2: Pass the end through the loop from the underside.
Step 3: Wrap the end around the standing part.
Step 4: Pass the end back through the loop and pull tight.
Clove Hitch
Step 1: Wrap the rope around the post.
Step 2: Cross the rope over itself and wrap it around the post again.
Step 3: Tuck the end under the last wrap and pull tight.
Figure Eight Knot
Step 1: Make a loop in the rope.
Step 2: Pass the end over the standing part and through the loop.
Step 3: Pull tight to form a figure eight shape.
Sheet Bend
Step 1: Form a loop with the thicker rope.
Step 2: Pass the end of the thinner rope through the loop from underneath.
Step 3: Wrap the thinner rope around both parts of the loop.
Step 4: Pass the end of the thinner rope back under itself and tighten.
3. Tips for Tying Knots
Practice Regularly: The more you practice, the more proficient you will become at tying knots.
Use the Right Rope: Different tasks require different types of ropes. Choose the right one for your specific need.
Keep Knots Tight: A loose knot can fail when put under pressure. Always ensure your knots are secure and tight.
Learn Knot Terminology: Familiarize yourself with terms like standing end, working end, and bight to follow instructions more easily.
Conclusion
Mastering the art of knot tying can greatly enhance your skills in various activities, from camping and sailing to DIY projects. With practice and the right techniques, you'll be able to tie knots confidently and securely. Start with these essential knots and expand your knowledge as you go. Happy knot tying!
Updated on
Safety starts with understanding how developers collect and share your data. Data privacy and security practices may vary based on your use, region, and age. The developer provided this information and may update it over time.

This app may share these data types with third parties
Device or other IDs

No data collected
Learn more about how developers declare collection

Data is encrypted in transit

You can request that data be deleted


