
RFID BOX

4.9star
7 reviews
5K+
Downloads

Everyone
info
About this app
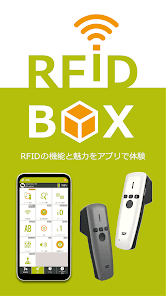
What is RFID BOX?
=================
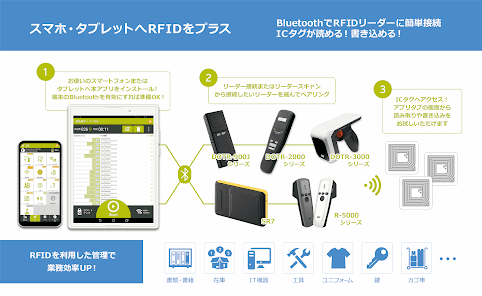
This is a dedicated app for the UHF band RFID reader/writer sold by our company that easily adds RFID functionality to smartphones and tablets.
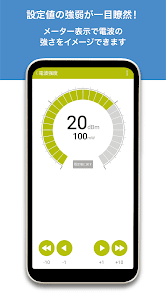
It has functions for reading, writing, and searching IC tags, as well as basic settings such as the radio field strength and buzzer volume of the paired RFID reader. The design allows intuitive operation, so even first-time users can easily use it by adjusting the signal strength to change the reading distance and finding hidden IC tags with the search function.
Not only customers who have purchased an RFID reader, but also customers who are evaluating the demo machine, please try it!
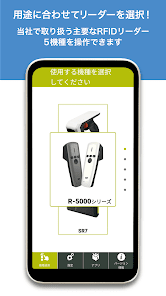
◆ Compatible RFID reader
・R-5000 series
・SR7
・DOTR-900J series
・DOTR-2000 series
・DOTR-3000 series
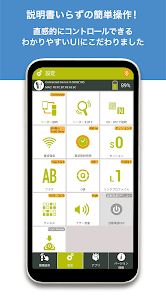
How to use RFID BOX
=================
I will briefly introduce how to use this application.
Please refer to the explanation displayed in the application for the setting of the RFID reader (hereinafter referred to as the reader).
◎ What to do first - Connect the reader to the device
----------------------------------------
① Select model
1) Enable Bluetooth on your device and launch the app.
2) Select the model to be used by scrolling in the "Model selection tab".
3) Move to the setting screen of the selected model.
4) Connect the reader and the terminal according to the explanation in the next item ②.
* There are differences in the items that can be set for each reader, and the items that are not supported are displayed in gray.
②Connect the reader
1) Turn on the reader and tap "Find Reader" in the "Settings" tab of the app.
2) Readers corresponding to the model selected in ① are detected as candidates.
3) Select the reader displayed in the "Detected Readers" area and tap "Connect".
4) When "Connected" is displayed on the app screen, the connection is complete.
◇ Automatic connection setting
If you check the "Automatically connect to this reader from next time" displayed at the bottom of the connected reader, the app will recognize it as the reader that will be preferentially connected, and will automatically connect the next time you launch it.
● Read IC tags - There are two ways
----------------------------------------
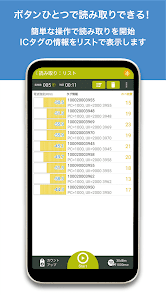
1) Tap "Read: List" in the Apps tab.
2) Press the irradiation button on the reader or tap "Start" at the bottom of the app.
3) The information of the read IC tag is displayed.
4) Release the irradiation button or tap "Stop" at the bottom of the app to stop reading the IC tag.
*For SR7, press the irradiation button once to read, and press again to stop.
◎ You can check the number of cards read, elapsed time, IC tag information, received signal strength, etc. in a list.
◎ In addition to rearranging IC tags, it is also possible to switch display modes such as counting up to display in the order read and counting down to erase the captured master.
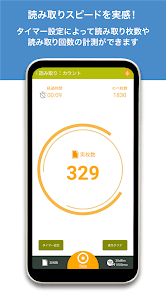
1) Tap "Read: Count" in the Apps tab.
2) Press the irradiation button on the reader or tap "Start" at the bottom of the app.
3) Release the irradiation button or tap "Stop" displayed in the app to stop reading the IC tag.
*For SR7, press the irradiation button once to read, and press again to stop.
◎When you execute tag reading, the number of read IC tags is counted. By setting the timer, you can measure the reading speed of IC tags and the number of readings. You can also switch the display between "Actual number" and "Total number" by changing the "Display mode" at the bottom left.
● Write data to the IC tag
----------------------------------------
Tap "Write Encoding" in the Apps tab. In addition to being able to number the data yourself, there is also an automatic numbering function.
1) Number the data to be written by "keyboard input" or "barcode scanning".
2) Select the numbering method.
・Enter one by one: This is a method of manually numbering each IC tag.
· Automatic (16/decimal): A method of automatically numbering sequentially based on the first numbered number.
2) Bring the IC tag closer to the antenna part of the reader.
3) Tap "Start" to execute burning.
4) Writing is completed when the encoding status progresses to "finished".
*Please note that if you increase the radio wave strength, it may be written to other IC tags placed nearby.
●Search for IC tags
----------------------------------------
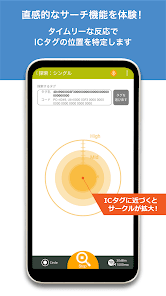
You can find a specific IC tag.
1) Tap "Explore Singles" in the Apps tab.
2) Enter the code of the IC tag to be searched for by either "keyboard input", "read by reader", or "select from master".
3) Press the irradiation button on the reader or tap "Start" to start searching.
4) When approaching the IC tag to be searched, the strength of the received radio wave becomes stronger, and the IC tag can be identified by moving toward the direction where the response is stronger. Since the strength of the radio wave is displayed in a timely manner, intuitive search is possible.
◎ By tapping "Display Mode" at the bottom left, you can select the display mode from "Bar" or "Circle".
◎The display mode "Bar" shows the distance to the IC tag by rising and falling the bar, and the stronger the received radio wave, the higher the bar. "Circle" indicates the distance to the IC tag by expanding or contracting the circle, and the stronger the received radio waves, the larger the circle.
About pairing (connection) between the reader and device using QR code/NFC
========================================
Devices that support QR code reading and NFC functionality can be easily connected to the reader by simply reading the QR code or NFC tag.
Please refer to the following for the setting and connection method with the reader.
◇Connection using QR code
1) Paste the "QR code" included at the time of purchase on the reader.
2) Enable Bluetooth on your device and select "Connect with QR/NFC" in "RFID BOX".
3) Select "Connect with QR code" and read the QR code with the camera.
4) When "Connected" is displayed on the app screen, the connection is complete.
For the second and subsequent connections, follow steps 2) to 4).
* The MAC address of the reader is set in the QR code in advance.
◇Connection using NFC
1) Connect the reader and device and check the "MAC address" displayed at the top of the app.
2) Write the confirmed MAC address on the NFC tag in [text/plain] format in single-byte characters like [00:00:00:00:00:00].
3) Enable NFC and Bluetooth on your device, and select "Connect with QR/NFC" in "RFID BOX".
4) Select "Connect with NFC" and touch the terminal to the NFC tag.
5) When "Connected" is displayed on the app screen, the connection is complete.
For the second and subsequent NFC pairing, follow steps 3) to 5).
By pasting the NFC tag with the MAC address written on it to the reader, it is possible to pair without hesitation even if there are multiple readers.
*It is necessary to prepare an NFC tag.
* Please obtain the application for NFC writing from Google Play.
Terms of Use
=================
"RFID BOX" is an application exclusively for the following RFID readers sold by our company.
・R-5000 series
・SR7
・DOTR-3000 series
・DOTR-2000 series
・DOTR-900J series
Even if you do not have a reader at hand, you can check the settings of the reader, but if you want to try all the functions, please apply for a demo machine or purchase it.
Applications can be made through the inquiry form on our website.
Developer/provider
=================
Tohoku Systems Support Co., Ltd. Strategic Business Division
=================
This is a dedicated app for the UHF band RFID reader/writer sold by our company that easily adds RFID functionality to smartphones and tablets.
It has functions for reading, writing, and searching IC tags, as well as basic settings such as the radio field strength and buzzer volume of the paired RFID reader. The design allows intuitive operation, so even first-time users can easily use it by adjusting the signal strength to change the reading distance and finding hidden IC tags with the search function.
Not only customers who have purchased an RFID reader, but also customers who are evaluating the demo machine, please try it!
◆ Compatible RFID reader
・R-5000 series
・SR7
・DOTR-900J series
・DOTR-2000 series
・DOTR-3000 series
How to use RFID BOX
=================
I will briefly introduce how to use this application.
Please refer to the explanation displayed in the application for the setting of the RFID reader (hereinafter referred to as the reader).
◎ What to do first - Connect the reader to the device
----------------------------------------
① Select model
1) Enable Bluetooth on your device and launch the app.
2) Select the model to be used by scrolling in the "Model selection tab".
3) Move to the setting screen of the selected model.
4) Connect the reader and the terminal according to the explanation in the next item ②.
* There are differences in the items that can be set for each reader, and the items that are not supported are displayed in gray.
②Connect the reader
1) Turn on the reader and tap "Find Reader" in the "Settings" tab of the app.
2) Readers corresponding to the model selected in ① are detected as candidates.
3) Select the reader displayed in the "Detected Readers" area and tap "Connect".
4) When "Connected" is displayed on the app screen, the connection is complete.
◇ Automatic connection setting
If you check the "Automatically connect to this reader from next time" displayed at the bottom of the connected reader, the app will recognize it as the reader that will be preferentially connected, and will automatically connect the next time you launch it.
● Read IC tags - There are two ways
----------------------------------------
1) Tap "Read: List" in the Apps tab.
2) Press the irradiation button on the reader or tap "Start" at the bottom of the app.
3) The information of the read IC tag is displayed.
4) Release the irradiation button or tap "Stop" at the bottom of the app to stop reading the IC tag.
*For SR7, press the irradiation button once to read, and press again to stop.
◎ You can check the number of cards read, elapsed time, IC tag information, received signal strength, etc. in a list.
◎ In addition to rearranging IC tags, it is also possible to switch display modes such as counting up to display in the order read and counting down to erase the captured master.
1) Tap "Read: Count" in the Apps tab.
2) Press the irradiation button on the reader or tap "Start" at the bottom of the app.
3) Release the irradiation button or tap "Stop" displayed in the app to stop reading the IC tag.
*For SR7, press the irradiation button once to read, and press again to stop.
◎When you execute tag reading, the number of read IC tags is counted. By setting the timer, you can measure the reading speed of IC tags and the number of readings. You can also switch the display between "Actual number" and "Total number" by changing the "Display mode" at the bottom left.
● Write data to the IC tag
----------------------------------------
Tap "Write Encoding" in the Apps tab. In addition to being able to number the data yourself, there is also an automatic numbering function.
1) Number the data to be written by "keyboard input" or "barcode scanning".
2) Select the numbering method.
・Enter one by one: This is a method of manually numbering each IC tag.
· Automatic (16/decimal): A method of automatically numbering sequentially based on the first numbered number.
2) Bring the IC tag closer to the antenna part of the reader.
3) Tap "Start" to execute burning.
4) Writing is completed when the encoding status progresses to "finished".
*Please note that if you increase the radio wave strength, it may be written to other IC tags placed nearby.
●Search for IC tags
----------------------------------------
You can find a specific IC tag.
1) Tap "Explore Singles" in the Apps tab.
2) Enter the code of the IC tag to be searched for by either "keyboard input", "read by reader", or "select from master".
3) Press the irradiation button on the reader or tap "Start" to start searching.
4) When approaching the IC tag to be searched, the strength of the received radio wave becomes stronger, and the IC tag can be identified by moving toward the direction where the response is stronger. Since the strength of the radio wave is displayed in a timely manner, intuitive search is possible.
◎ By tapping "Display Mode" at the bottom left, you can select the display mode from "Bar" or "Circle".
◎The display mode "Bar" shows the distance to the IC tag by rising and falling the bar, and the stronger the received radio wave, the higher the bar. "Circle" indicates the distance to the IC tag by expanding or contracting the circle, and the stronger the received radio waves, the larger the circle.
About pairing (connection) between the reader and device using QR code/NFC
========================================
Devices that support QR code reading and NFC functionality can be easily connected to the reader by simply reading the QR code or NFC tag.
Please refer to the following for the setting and connection method with the reader.
◇Connection using QR code
1) Paste the "QR code" included at the time of purchase on the reader.
2) Enable Bluetooth on your device and select "Connect with QR/NFC" in "RFID BOX".
3) Select "Connect with QR code" and read the QR code with the camera.
4) When "Connected" is displayed on the app screen, the connection is complete.
For the second and subsequent connections, follow steps 2) to 4).
* The MAC address of the reader is set in the QR code in advance.
◇Connection using NFC
1) Connect the reader and device and check the "MAC address" displayed at the top of the app.
2) Write the confirmed MAC address on the NFC tag in [text/plain] format in single-byte characters like [00:00:00:00:00:00].
3) Enable NFC and Bluetooth on your device, and select "Connect with QR/NFC" in "RFID BOX".
4) Select "Connect with NFC" and touch the terminal to the NFC tag.
5) When "Connected" is displayed on the app screen, the connection is complete.
For the second and subsequent NFC pairing, follow steps 3) to 5).
By pasting the NFC tag with the MAC address written on it to the reader, it is possible to pair without hesitation even if there are multiple readers.
*It is necessary to prepare an NFC tag.
* Please obtain the application for NFC writing from Google Play.
Terms of Use
=================
"RFID BOX" is an application exclusively for the following RFID readers sold by our company.
・R-5000 series
・SR7
・DOTR-3000 series
・DOTR-2000 series
・DOTR-900J series
Even if you do not have a reader at hand, you can check the settings of the reader, but if you want to try all the functions, please apply for a demo machine or purchase it.
Applications can be made through the inquiry form on our website.
Developer/provider
=================
Tohoku Systems Support Co., Ltd. Strategic Business Division
Updated on
Safety starts with understanding how developers collect and share your data. Data privacy and security practices may vary based on your use, region, and age. The developer provided this information and may update it over time.

No data shared with third parties
Learn more about how developers declare sharing

No data collected
Learn more about how developers declare collection
Ratings and reviews
4.9
7 reviews
What's new
SR7での読み取りを改善