
就寝時間 起床時間 記録帳
10+
Downloads

Everyone
info


About this app
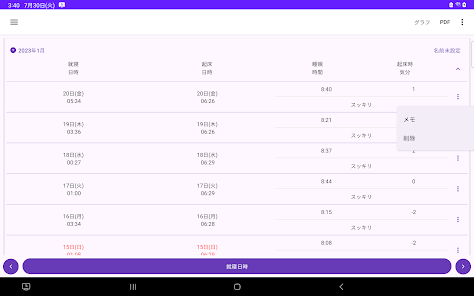
Your sleep time is calculated based on the entered bedtime and wake-up time.
Your sleep time is displayed as a line graph and a bar graph.
You can keep track of your sleep time using the line graph and bar graph.
■Differences from the free version
No ads are displayed.
The app icon changes to a star.
The screen design is slightly different.
Otherwise, it's the same as the free version.
This is a one-time purchase, not a monthly or yearly subscription.
▼Transferring data from the free version to the paid version
・For the same smartphone/tablet
1. Install the paid version.
2. In the free version, click the three-dot menu in the upper right corner.
3. Click "Transfer data" for the paid version (remove ads).
4. Click the "Copy" button.
→ The records will be copied in a few seconds.
The time it takes to copy will vary depending on the number of records.
・For a different smartphone/tablet
→ Create a backup file and restore it using "Data Transfer" when changing devices.
▼To record bedtime and date/time
1. Tap the "Bedtime" button.
If you press and hold/tap, steps 2 and 3 will be skipped.
The current date and time will be set.
2. Select the date and time and tap "Next."
3. Enter your bedtime and tap OK.
▼To record your wake-up date and time
1. Tap the "Wake-up Date and Time" button in the wake-up date and time column of the table.
If you press and hold/tap, steps 2 and 3 will be skipped.
The current date and time will be set.
2. Select the date and time and tap "Next."
3. Enter your wake-up time and tap "Done."
▼To record your wake-up date and time immediately
If you press and hold/tap the "Wake-up Date and Time" text in the wake-up date and time column of the table, you can record that date and time as your wake-up date and time.
▼Sleep Time
The sleep time displayed in the table is automatically calculated based on your bedtime and wake-up date and time.
▼To record your mood upon waking
1. Tap the "Wake-up Mood" button in the "Wake-up Mood" column of the table.
2. Select your wake-up mood.
▼To delete a single record
Press and hold the record you want to delete in the table
The deletion screen will appear.
▼To delete all records
You can delete all records by selecting "Erase All Data" from the menu in the upper right corner.
▼Data Transfer for Device Change
Tap "Data Transfer for Device Change" in the menu to display the following selection screen.
・Create File (Create a backup file for device change)
・Restore (Restore data from a backup file)
Step A. Creating a Backup File
1. Tap "Data Transfer for Device Change" in the menu.
2. Tap "Create File."
3. Tap "Create File" on the confirmation screen.
4. Tap "Select App" on the send screen.
5. Tap "Save to Drive."
Step B. Restore (Restore data from the backup file created in Step A)
1. Launch Google Drive on your new smartphone/tablet, select the backup file, and tap "Download" from the menu.
2. Install this app from Google Play on your new smartphone/tablet. Launch the app.
3. Tap "Device Change Data Transfer" in the menu.
4. Tap Restore.
5. Tap the file you want to restore from the list of files to restore.
Updated on
Safety starts with understanding how developers collect and share your data. Data privacy and security practices may vary based on your use, region, and age. The developer provided this information and may update it over time.

No data shared with third parties
Learn more about how developers declare sharing

No data collected
Learn more about how developers declare collection

Committed to follow the Play Families Policy
What’s new
画面を変更しました
App support
About the developer
YUTAKA IZUMIYAMA
sinagawafoodexpenses@gmail.com
東浦賀1丁目13−1
1612
横須賀市, 神奈川県 239-0821
Japan
